
Tips for processing an Elk
This is rutting season for elk, the perfect time to harvest them. It is a favorite time of year for recalling my nearly two decades of working at wilderness hunting camps as a cook. After finally getting an elk, the local butcher could be swamped, forcing you into a crash course in processing your own meat. It is a lot of work. The average bull elk weighs about 1,000 pounds, which will result in about 500 pounds of meat. Imagine our ancestors did this nearly every day of their lives. It is a lot easier now, due to tools such as meat grinders, sharp knives, freezers, electricity and so on.
Even with these modern tools, I cannot imagine tackling a buffalo in more primitive conditions!
First, buy a big freezer or make a list of relatives and elders who could use meat. Hope that the hunter had a clean shot, not blowing up too much of the meat (maybe that is why arrows worked better for hunting food). Properly field dress the elk, not getting it too dirty, remove the sexual glands properly (if not, the meat could be tainted); do not get a lot of hair on the exposed meat, and save the brains, liver, heart, and tongue—delicacies for Native people.
Now, for a blend of tips shared by the Rocky Mountain Elk Foundation1, together with Cheyenne tips, and a diagram to guide you, then of course many firsthand Native practical butchering insights sprinkled throughout this self-sufficiency column.
1 – Hanging meat for aging and tenderizing is usually preferred, and pretty easy in the fall. Find a tall tree, hoist the elk up out of reach of critters, let it hang for about a week. Or, if you have a garage, hang it in there. The weather is cool then. After that, comes skinning the hide. It comes off pretty easily. Save it, scrape off the fat, blood, and membrane, a task in itself. Do NOT throw the hide away; instead, roll it up for another job. (Later, a lesson on how to tan that hide for useful purposes, Great Plains tribal style.) Once again, I am amazed at the amount of labor and time our ancestors invested (especially the butchering, a woman’s job) things which we now take for granted –having something to eat or clothes to wear. What if you did not have something to eat or clothes to wear? Deadly proposition.
2 – Next, get a large workspace that can easily be cleaned, ideally steel or a nonporous surface that won’t absorb the blood. It takes quite a bit of space. A rather clean garage with a steel work table would be ideal, otherwise be prepared to lose your kitchen table, actually the whole kitchen for several days. Be prepared to dine on sandwiches or “to go” foods. You will be too busy to cook. If the weather is good, work outside on a tarp. The four basic tools for butchering are simple around-the-house tools. You will need good sharp knives, a whetstone to sharpen them, a hacksaw, and a cutting board. You may also wish to use rubber gloves.
3 – Cleanliness is crucial. Rinse the skinned carcass (or quarters) and pat dry before you begin cutting. Wash your tools with soap and water before you start, and clean your knife after each sharpening. If it’s not too cold, set up a cleaning table outside and use a hose with a high-pressure nozzle to do this. Even a garden hose will work.
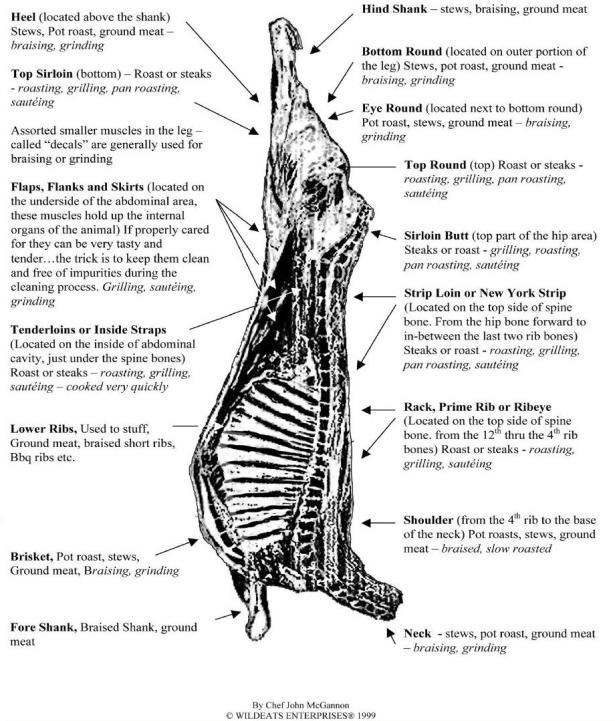
4 – The goal is to simply reduce the carcass to individual muscles or groups of muscles, per this diagram. Start by removing the legs. Rear legs are jointed and fit into a socket in the hip. Front legs fit onto the chest, mainly with muscles & tendons. The rest of the animal basically is ribs, neck, and spine; this meat can be filleted from these areas. Remove backstraps by slicing down the center of the back and boning along the spine outward onto ribs. VERY IMPORTANT: Slice off the sinew and soak it. It can then be dried and split to produce the toughest sewing thread on the planet. The irritating part is removing the “silver fish” the white shiny membrane around the tendons. Backstrap time! The most tender part usually looks like a long pork sirloin, perfect for slicing into steaks, breaded, fried, and served with fried “taters” and fry bread. Those don’t last too long as everyone loves them. Don’t forget to take the tenderloins from the inside spine. Second most tender cut of elk meat.
5 – Don’t try to make chops. Without professional-grade saws and butchering tools, consider simply cutting meat off the bones to make steaks, roasts, stew meat, jerky, or dry meat. When cutting a muscle into finished pieces, remember to cut across the grain of the meat.
6 – If making dry meat, you’ll need a place to hang it. Traditionally, a long lodge pole pine graced the kitchens of most of our Cheyenne homes for this purpose and still often does. Clothesline or cord will also work. Some like to soak the dry meat strips in salt water to discourage flies, some use cheesecloth to protect it from flies, and some hang it outside where a cool breeze will accomplish the same thing. Be careful though – hanging the meat outside could attract carnivores; in our area that could be bears, coyotes, dogs, or even mountain lions. The way to cut dry meat will take another story which the Cheyenne call “rolling out the Bible.” Dry meat has to also be flipped over to dry evenly, and depending on the temperature outside, can take several days to complete. Dry meat will keep for years, either stored in paper (not plastic) sacks or frozen. Many other people make jerky, a different process. Trim away bloodshot meat and save it. Makes for good dog food or coyote bait.
7 – Use another bag or tub for clean trimmings or cuts for grinding into burger. There are now electric grinders, yet the old hand-operated ones work plumb fine. As elk meat is very lean, adding some suet will make for a juicier burger. Sometimes it is easier to freeze it and take it to a butcher or meat processing plant later.
8 – If you have a vacuum-type food sealer, use it. Otherwise, wrap meat in cellophane or butcher paper, double wrapping is better. Mark each package with the date and type of cut so your relatives will know that.
Happy hunting, happy harvesting, happy eating all winter long.
(Clara Caufield can be reached @acheyennereview@gmail. com.)
The post Tips for processing an Elk first appeared on Native Sun News Today.