Surviving extreme temps during power outages could depend on alternative energy – wind power
Every year hundreds of deaths across the U.S. especially in remote rural areas and lower income areas are attributed to extreme temperatures, severe weather, natural disasters, and power outages. Since 2021Texas and Michigan have seen fatalities in the hundreds from power outages related to severe weather events. This week in Northern New Mexico thousands are without power after two feet of snow fell over the weekend and blizzard conditions created chaos. Residents like Alexandra Gaytan encouraged their communities to help neighbors to get through this catastrophe. In 2022, Southeastern South Dakota saw 215 outages affecting more than 5000 people as a result of a severe thunderstorm. According to a report by “Indigenously” almost every indigenous South Dakotan knows someone who has died of exposure to extreme temperatures and unreliable energy sources.
Mainstream media outlets seldom report the scope of the problems on native lands and often attribute weather-related deaths to personal failures on the part of the deceased instead of acknowledging the underlying systemic causes for power related mortality. The reality points to environmental conditions related to global climate extremes and weather pattern shifts disproportionately affecting the most vulnerable. Unseasonable temperature extremes, high winds knocking over utility poles, heavy snow or ice on the lines, trees falling on power lines, delayed repair times for power line damages in poorer communities, increased energy demand or simply the high cost of energy and inadequate income all contribute to mortality risks on the reservations. Installing alternative energy cannot prevent bad weather but it can help you to prepare for extreme cold, heat, storms, and grid failure when they occur.
Earlier this year, an article in the Native Sun was published about a group of innovative Oglala Sioux Tribal members in the town of Manderson on the Pine Ridge reservation, who learned how to install solar energy. In the Lakota culture, this is known as Woksape, one of the sacred virtues, honoring the wisdom of those more knowledgeable and experienced. Wise elders tell us to be ready for hardships, to learn how to survive. We can learn from them by seeking their advice and learning from their years of experience.
While embarking on a project to install a wind generator with hopes of increasing my energy resilience at home, I decided to first look to the experts. I asked questions on quora.com and discovered that increasing the size of the wire incrementally could minimize resistance and lead to a faster charging rate.
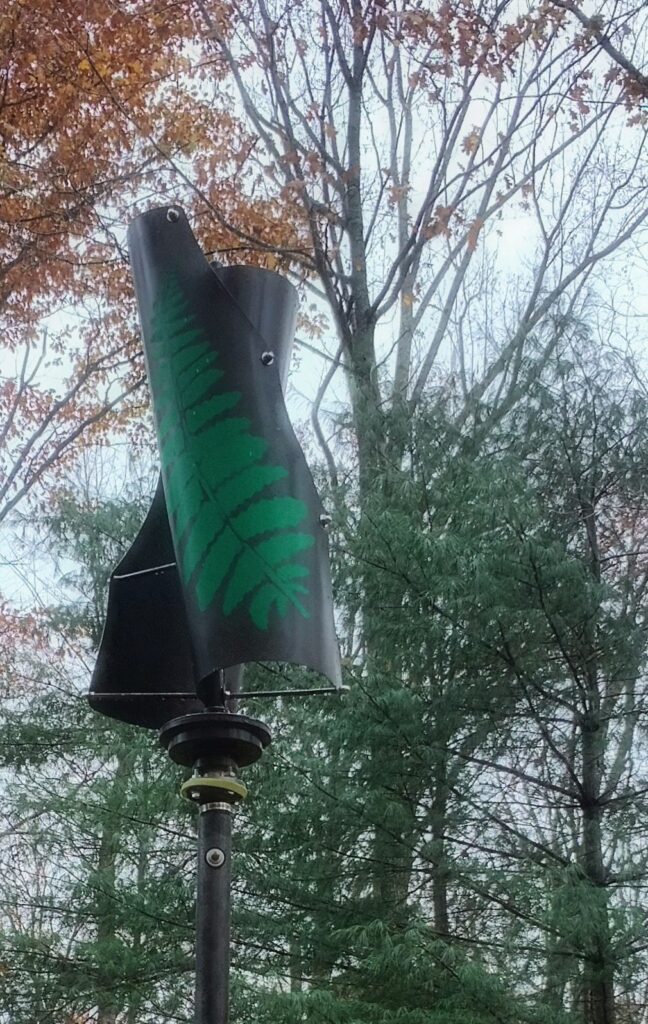
I read a few online articles and searched for information I books from my library, but learned as much, if not more, from two elders close to home who had experience installing electrical systems. One was a former diesel mechanic, Fred Balash, and another was a prolific builder and construction expert, Tony Pendleton, with whom I had worked on construction sites in the past. Fred enlightened me on the benefits of using 6 volt batteries for my 12/24 volt, 60 ah (ampere hours) energy storage system, the proper method of connecting the batteries, and the grounding components needed. Tony offered step by step instructions for driving an 8ft grounding rod 7 feet into dense rocky soil. The rest was grounded theory, common sense, and trial and error on my part, but the end result was this wonderfully spinning, bird friendly, helix-shaped, vertical-axis, wind power generating rig that will ultimately run an appliance and some lights in the middle of summer when storms knock the power out, and no trees were cut down in the process.
While my little generator only produces a maximum of 400 watts of power in optimum conditions at a cost of $200 for the turbine/generator kit (batteries, wires and components, mounting structure, hardware, tools, and conduit not included), similar generators produce up to 10,000 watts (10kw) of power. Being an out of work, freelance writer, I opted for the least expensive version and fully intended to get the most possible efficiency out of it, even in my forest enclave surrounded by 75ft trees.
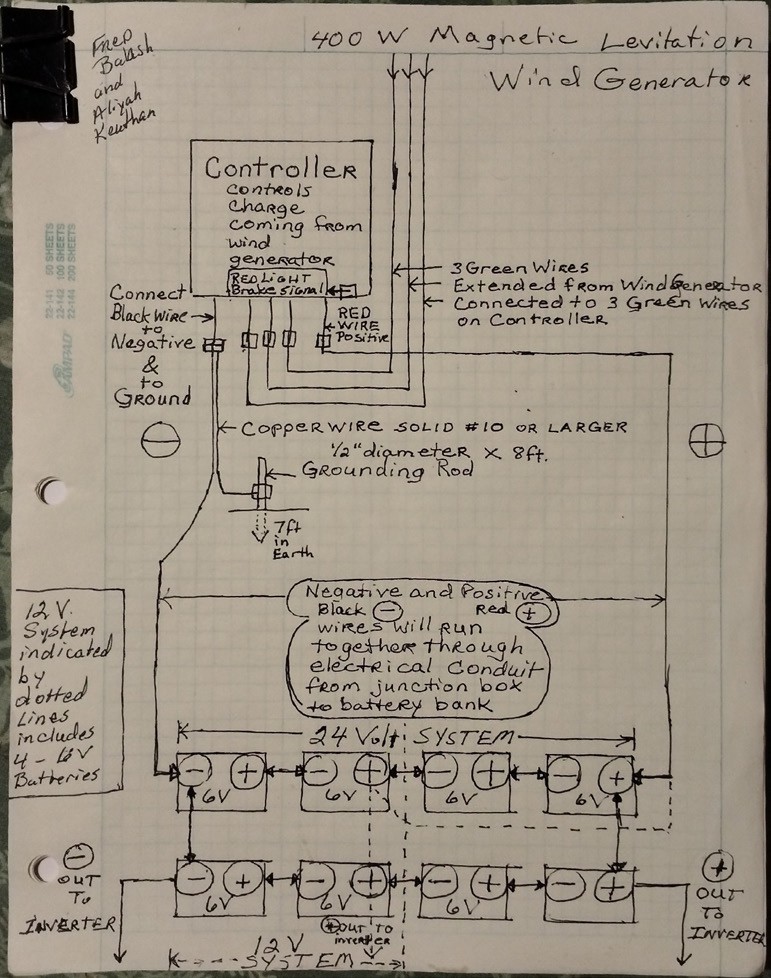
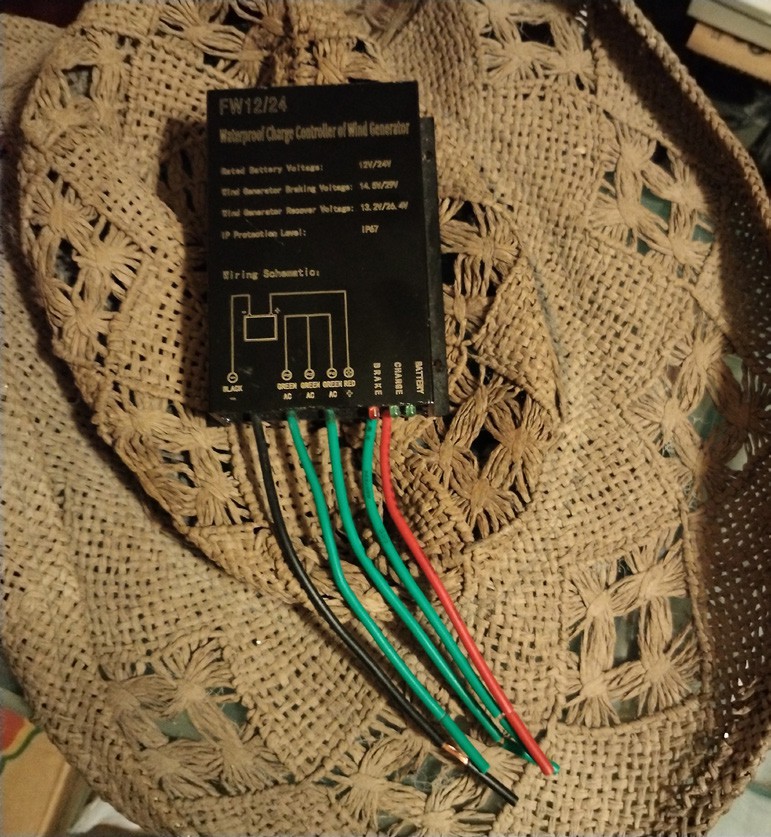
No instruction manual came with the kit so I provided a detailed account of my wind power journey in parts 1 and 2 of this sequel. This (part 3) is the final segment. In part 1 we overcame obstacles and survived. In part 2 we had finished installing the junction box with the generator wires running into it. We were ready to connect those wires to the controller that came with the kit but first we must drill a hole in the bottom of the junction box, big enough into which a gray plastic or galvanized metal conduit and a #10 copper grounding wire will fit. The schematic drawing depicts the path and offers a description of the wires and connections in the following order:
1. Wires extend from the generator into the junction box and are connected to three green wires from the controller.
2. Run the black and red wires through the conduit that goes from the battery bank to the junction box leaving a few inches of wire exposed through the hole in the bottom of the junction box. Leave 3 to 4 extra feet of wire at the end of the conduit that is by the battery bank (Note: #14 wire is ok but I used the larger diameter #8 wire for less resistance to counter the low wind current).
3. Connect the end of the black wire to the black (negative) wire on the controller.
4. Connect a solid (minimum #10) copper wire from the same black wire on the controller through the hole in the bottom of the junction box and to the brass connector, which you must attach to the exposed end of the grounding rod.
5. Connect the end of the red wire to the red (positive) wire on the controller.
6. Connect the black wire at the other end of the conduit to an open negative battery terminal and connect the red wire from the conduit to an open positive battery terminal as indicated in the drawing.
7. Connect the batteries in series (positive terminal to negative terminal) as shown.
8. Connect the group of four or eight 6 volt batteries in parallel (positive terminal to positive terminal and negative to negative as shown) creating maximum efficiency.
9. Connect the black cable clamp of the 410 Watt power converter to the negative battery terminal as shown and the red cable clamp of the power converter to the positive battery terminal as shown.
10. When batteries are fully charged (determined by using a meter) you can plug in an appliance or lights and charge your electronic devices.
I have three space heaters running in the coldest months at 900 to 1500 watts each. To run these I would need a 4500 Watt system. During a winter outage, if you can heat one room you can survive. The best way to plan ahead is to experiment with various heaters in different rooms, see how many watts you need to heat each room, and design your alternative energy system around that wattage with added wattage for lights and cooking. Add up the wattages of all your appliances that you run daily at the same time and that total is how many watts your system must produce. Stay safe out there.
(Contact Aliyah Keuthan at kestreldancing@gmail.com)
The post Surviving extreme temps during power outages could depend on alternative energy – wind power first appeared on Native Sun News Today.
Tags: Environment


